What’s so difficult about packing a bug out bag? You just throw all your carefully selected items into your chosen bug out bag and off you go, right? You could but you will learn some lessons really quick because discomfort, pain, and suffering are some of the best teachers.

Properly packing a bug out bag for You, i.e. for your peak efficiency and mobility, is made up of three parts, one part Science, one part Art, and one part Experience. You really need all three of these to be successful. I can assist you with the first two but the third one (Experience) that’s on you.
The Science
When it comes to packing your bug out bag the Science part can be divided into two more parts, the things you need to survive and Physics.
What You Need
The items you put in your bug out bag are completely up to you and your specific situation but remember that this bag and its contents may be the difference between life and death. I wrote an in-depth article on building a bug out bag and all of the necessary items and equipment needed to do so, check it out here >>>How To Build A Bug Out Bag/Kit – A Practical Guide
The Physics
The physics part is all about packing your bug out bag in such a way to help stabilize your center of gravity. To do this you want to place the heaviest items centered on your spine, above your hips, and below your shoulders (preferably between your shoulder blades if possible) and as close to your back as possible.
If the heaviest items are at the top of the bag it will be top heavy. A top-heavy bag will make you very unstable. If the heaviest items are at the bottom of the bag it will cause a lot of strain on your lower back, hips, and abdominals.
The Art
There is a bit of an art to packing and organizing a bug out bag. It’s not enough to pack it strictly by item weight. You also need to think about the importance of each item and how often you may need to access each one. You wouldn’t pack your rain gear in the bottom of your top access bag if you lived somewhere it rains at least once or twice a week.
Another consideration is the type of pack you are using. Some packs, like many hiking/backpacking packs, are top loading, which means to reach the items in the bottom of the pack you need to unload all of your gear from the top of the pack. Although most of these styles of packs also have separate access on the very bottom for a sleeping bag compartment which is often completely separate from the main compartment.
Priorities
It doesn’t matter how much my trauma/first aid kit or self-defense tools weigh, these items are of such importance that their placement overrides all other factors. Other items will also take priority and their placement in your bag will reflect the access-urgency, aka things you need to access quickly, must be placed on the periphery of the pack. Otherwise, all other items should be organized by weight.
Experience
The last element is Experience. One of our greatest teachers is Experience. You can follow someone’s advice to the letter T and It may not work for you. They may have had many years of experience and have perfected their system but that’s “their” system. Everyone has different needs, different body mechanics, different load carrying capabilities, different equipment and so on. Getting out and doing it will teach you about yourself and your gear.
If you think you will be carrying your bug out bag for any distance, you need to start carrying your bug out bag. This part is easy, you just put on your pack and get hiking. Something to consider is how far your bug out location is from your home or starting point. Is it 5, 10, 20 miles or more? If so, can you even walk that distance without your bug out bag? If you can’t even walk that distance then you should consider working on your physical conditioning. For more information on attaining a survival level of fitness check out my article Fitness For Preppers – The Strength To Survive
The key is to incrementally add more distance to each consecutive hike using a linear progression. First, hike a mile or two across the type of terrain you will be crossing, then evaluate any hot spots with your footwear, gear, and pack.
If you don’t know what hot spots are, they are areas where rubbing is occurring and if left untreated, a sore or blister will develop. This is term is usually referenced when talking about foot care but I also use it when talking about other gear and equipment as well. You need to learn where your hot spots are so you can prevent them.
Next, you need to make any adjustments to your pack and/or gear, take a couple of days off for recovery then add a little more distance to your next hike and reevaluate your setup again. Then repeat this process as necessary until you are satisfied with your distance and setup.
Putting It All Together
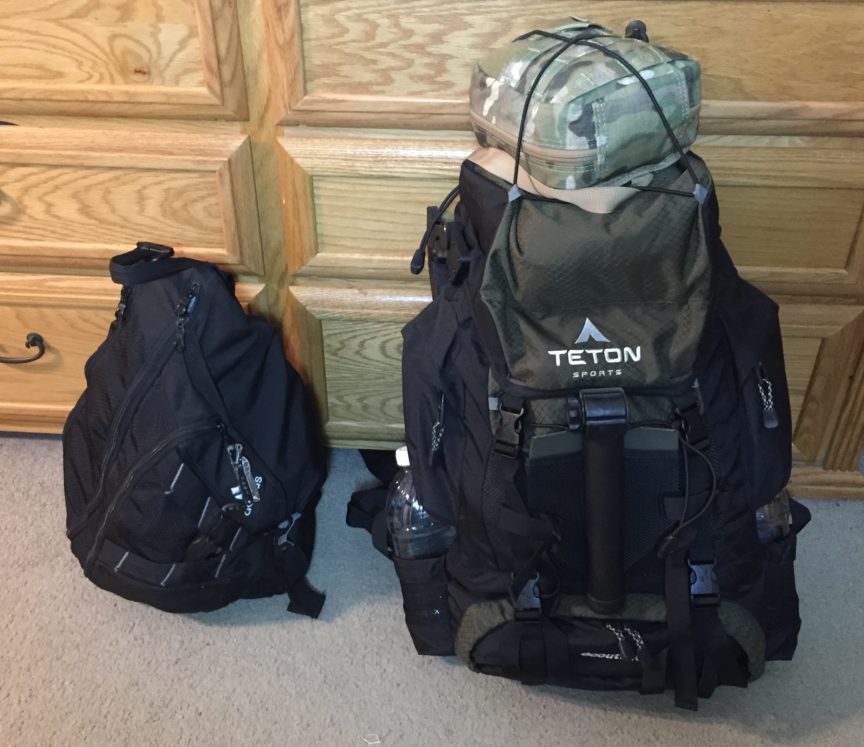
Not everyone has the same style bug out bag, some are made for multi-day backpack camping excursions and others are just really large school style bags that are more for light trail hiking. For this discussion, we will be using the multi-day camping style as it lends itself better to bugging out on foot over long distances.
Sleep System First
Your sleep system i.e. sleeping bag or bivy sack should be at the bottom of your bag, we do this for two reasons. First, your sleep system will be the last thing you will need to unpack after getting your evening arrangments squared away. Secondly, these items are usually large and bulky but are not that heavy, and by placing them in the bottom of your bag it will force the next items which are heavier, to be positioned higher towards the middle of your back.
Food And Cook System
The next thing to add to your bag should be your food and cook system. Depending on your food choice you may or may not have food prep equipment like a camp stove with fuel canisters and cookware. These items are some of the heaviest in your bag with the exception of water.
These items need to be positioned so that they are close to your spine and near your shoulder blades. This will provide the best balance and stability.
Foods like freeze-dried meals are very light and somewhat bulky, these can be packed at the bottom (above the sleeping bag) and around your cooking equipment to help keep the heavier items centered in the pack.
MRE’s are rather heavy, as bug-out foods are concerned, and should be packed above or in place of your cook system if you do not have one. Why above? Because MRE’s don’t require cooking, this way you can access them without having to remove gear from your pack unnecessarily.
Extra Water
If you live somewhere that has limited water sources you will want to carry extra water in your pack. One of the best ways to carry extra water is by using a 2 or 3-liter water bladder. Most packs these days have a pocket for a water bladder that places the bladder right where you want it, right between your shoulder blades.
The Non-Essentials
Now that we got the bulky and heavy items in, it’s time to fill in around those items with smaller mid-weight non-essential items. These are things that you don’t need frequent access to and are not a top priority. Included in these items is gear like a water filter, fire kit, hygiene kit, extra clothing, etc.
Priority Gear
In the top of the main compartment, lid pockets and in the exterior pockets is where you will place items that are more frequently accessed or items that quick access is necessary.
Front Pocket – Many packs have a pocket on the front of the pack. These are often a mesh pocket and great for keeping rain gear and/or a VS-17 signal panel.
Main Compartment – In the top of the main compartment is where you keep things you may need fast or frequent access to like a first aid kit, extra socks or your rain gear if your pack doesn’t a front pocket.
Lid Pockets – Most packs have exterior pockets on the lid or near the top the pack. These are great for those items that you want easy access to like meal replacement bars, flashlights/headlamps, batteries, maps and compass, GPS, and/or anything you may want or need frequent access to.
Side Pouches – Most Packs have side pouches at the bottom of the bag. These are most commonly used for water bottles making them easy to grab while on the move.
Quick Note – Keep in mind when attaching gear like hatches, machetes, trekking poles, tents, ground pads, etc., to the outside of your pack, to make sure that it is attached securely so that it will not shift around while moving and to prevent loss of critical gear.
Tents and Ground Pads – If you have the option of carrying a small tent and/or ground pad that’s great but these will often need to be secured to the outside of the pack due to the lack of space inside. There are two main ways to attach these to the outside of your pack. The first and more traditional way is to secure the tent to the bottom and the ground pad to the top of the pack horizontally. This method is easiest to set up as most packs have straps and provisions for doing it this way.
The second method is to attach them vertically to the sides or front of the pack. This method is often more difficult to set up but does streamline your pack making it easier to navigate through dense woods and vegetation, making it less likely to snag on shrubs and branches.
Organization
We can’t wrap this up without touching on internal pack organization. There are many options out there for bags and pouches to organize the gear in your pack but for most things, I like using Ziplock Freezer bags.
Ziplock Freezer bags are lightweight, durable, and inexpensive, and because it is a sealing bag, it is watertight for the most part, adding another layer of protection for your gear from the elements. They are also clear so you can easily identify the contents. They come in a variety of sizes to accommodate most any gear you would place in your pack.
Final Thoughts
Getting your bug out bag packed right for your needs takes some trial and error but once you get it refined it will make that future bug out painless allowing you to focus on more important things.